This device has no English text-to-speech voice, so the article may not be read aloud.

Riceberry is a photoperiod-insensitive rice that can be grown all year round. In areas or seasons with cool weather, the brown rice grains will have a deeper color.
- 1) Preparing the rice field
- 2) Managing soil fertility
- 3) Planting to prevent chemical contamination
- 4) Weed control
- 5) Preparing rice seed for sowing
- 6) Transplanting
- 7) Water management in the field
- 8) Disease and insect management in organic rice
- 9) Harvesting rice
- 10) Drying rice and storing the harvest

1) Preparing the rice field
This is soil preparation using labor-saving equipment, consisting of:
- First plowing means turning over the topsoil, drying the soil in the sun, and mixing straw, weeds and so on into the soil. The equipment may range from a walk-behind tractor to a tractor. Then leave it for about 1 week.
- Second plowing means plowing a second time after the first plowing and a period of sun-drying. This plowing turns the soil over again and makes harrowing easier afterwards.
- Harrowing or using a clod crusher means removing weeds, breaking up the soil, and puddling it ready for transplanting or broadcasting. This step requires the field to have been flooded for a while to give soil conditions suitable for harrowing. Use a clod crusher or a rotary tiller.

2) Managing soil fertility
Because growing Riceberry under an organic farming system avoids chemical fertilizer, choosing a growing area whose soil is naturally highly fertile is an advantageous start for keeping yields at a satisfactory level. In addition, farmers must know proper soil management and try to maintain soil fertility so it suits organic rice growing as effectively and sustainably as possible.
Recommendations on soil fertility management for organic rice production can be divided into 3 parts: soil management, use of organic fertilizer, and use of organic materials in place of chemical fertilizer.
2.1) Soil management
Recommendations for management to maintain soil fertility suitable for growing organic rice are as follows:
- Do not burn stubble, rice straw and organic residue in the field, because that destroys organic matter and beneficial soil microorganisms.
- Do not remove plant parts of no direct use from the field; instead, apply organic materials from nearby sources to the field regularly, a little at a time.
- Add organic matter to the soil by growing legumes on vacant areas of the field as appropriate, and use the organic matter produced within the farm system to benefit rice growing.
- Do not leave the land bare before planting rice and after harvest; instead grow cover crops, especially legumes such as mung bean, jack bean and sesbania, emphasizing increased soil fertility.
- Prevent loss of topsoil from erosion by using mulch and cover crops, and till properly.

2.2) Organic fertilizer
Avoid all synthetic chemical fertilizers and use natural organic fertilizers regularly. Because natural organic fertilizers have a fairly low concentration of major nutrients, they must be used in larger amounts and may not be sufficient for organic rice growing, and if poorly managed they raise production costs. Organic matter should therefore be added to the area regularly.
- Manure or animal-dung fertilizer means various animal dung, which may be brought in from outside or produced on the farm. In addition, rural paddy fields after harvest are often left as grazing areas, where animals graze on stubble and grasses. Dung dropped mixed with plant residue is another way of adding organic matter to the field.
- Compost should be made in the field or in an area not far from it, for convenience of use. Microbial inoculants should be used in making compost to help it decompose faster, and it should be stored properly to reduce nutrient loss. *** Manure or compost should be applied about 1 month before the first plowing, releasing complete nutrients, at a rate of 300–500 kilograms per rai, then plowed in with the first plowing.
Preparing liquid compost
Liquid fermented fertilizer (LDD 2) is a liquid fertilizer obtained from the decomposition of leftover materials from various parts of plants or animals through fermentation in an oxygen-free environment, where microorganisms break down those plant and animal remains into a solution, including the use of naturally occurring enzymes or added enzymes to speed decomposition, making the decomposition process even faster.
How to make it
- Mix prepared vegetable and fruit scraps, raw and ripe, and fruit peels with molasses, mixing well, and put them in a tank. If there is too much, sprinkle them over in alternating layers, mixing well, then arranging in layers.
- Dissolve LDD 2 in water and add it to the tank, stirring to mix.
- Close the lid tightly to keep air out so the microorganisms can decompose well.
- Store it in the shade, out of sunlight and rain.
- Ferment for about 20–30 days before use.
- During fermentation, after about 10 days, open the lid to release fermentation gas.
How to use it
- Mix the bio-fermented liquid with clean water at a ratio of 1:20.
- Begin applying when plants start to sprout or 2 weeks before insects come to disturb, once every 2 weeks.
- Can be used with all kinds of plants.
- Spray in the morning or after rain, and apply regularly.
- Green manure should be a type suited to the environment. It should be planted a reasonable time before transplanting rice so the green manure plants have enough growth time to produce plenty of fresh biomass with a high nitrogen concentration, and plowed in before planting rice on schedule. For example, African sesbania (Sesbania rostrata) should be planted about 70 days before transplanting rice, at a seed rate of about 7 kilograms per rai. If phosphorus fertilizer is needed to speed growth, finely ground rock phosphate is recommended, applied during soil preparation, then plow in the sesbania plants at about 50–55 days of age or about 15 days before transplanting rice.
Preparing green manure
Green manure is obtained by growing soil-improving plants in the area and then plowing them in to add plant nutrients to the soil, mostly legumes.
Benefits of green manure
- Increases organic matter and nitrogen in the soil
- Maintains soil fertility
- Keeps the soil moist and helps it hold water better
- Reduces topsoil loss from erosion
- Makes the soil loose and easy to prepare and till
- Suppresses some weeds
- Acids from decay and decomposition help dissolve nutrients in the soil for plants to a greater extent
- Reduces somewhat the use of expensive chemical fertilizer
- Increases crop yield
2.3) Using some organic materials in place of chemical fertilizer
If, after following the soil fertility management recommendations above, the soil is still found to be insufficiently fertile or lacking some important nutrients, the following natural organic materials can replace some chemical fertilizers:
- Nitrogen (N) sources: such as azolla, blue-green algae, neem seed cake, dried animal blood, bone meal and so on
- Phosphorus (P) sources: such as rock phosphate, bone meal, chicken manure, bat guano, seed meal, wood ash, seaweed and so on
- Potassium (K) sources: such as ash and some limestones
- Calcium sources: such as lime, dolomite, ground shells, bone meal and so on
3) Planting to prevent contamination from outside the area
Plant fast-growing trees as a buffer zone to block wind, insect pests and chemicals from other areas, such as leucaena, sesbania, pigeon pea and vetiver grass.
4) Weed control
Avoid all synthetic chemicals for weed control. Controlling weeds by mechanical methods is recommended, such as proper soil preparation, farming by transplanting and using water level to control weeds, using mulch, hand pulling, using tools, and crop rotation.

5) Preparing rice seed for sowing
Soak Riceberry seed in clean water for 1 night (no more than 12 hours) If seed is soaked too long, the rice is found to rot and fail to germinate, then continue soaking in Trichoderma fungus solution, at a ratio of 1 kilogram of fresh inoculum to 20 liters of water, rubbing to take only the green spores, soaking for 30 minutes, and then incubating for 2 nights. You can order Trichoderma at this page https://www.facebook.com/profile.php?id=100057187641372
Recommendations
- Do not use old seed or seed stored too long, as the germination rate will fall.
- Choose to buy good, true-to-type seed that has passed seed production standards certified by a credible organization, with a sales license, high seed purity, low impurities and a germination rate of no less than 80%.
6) Transplanting
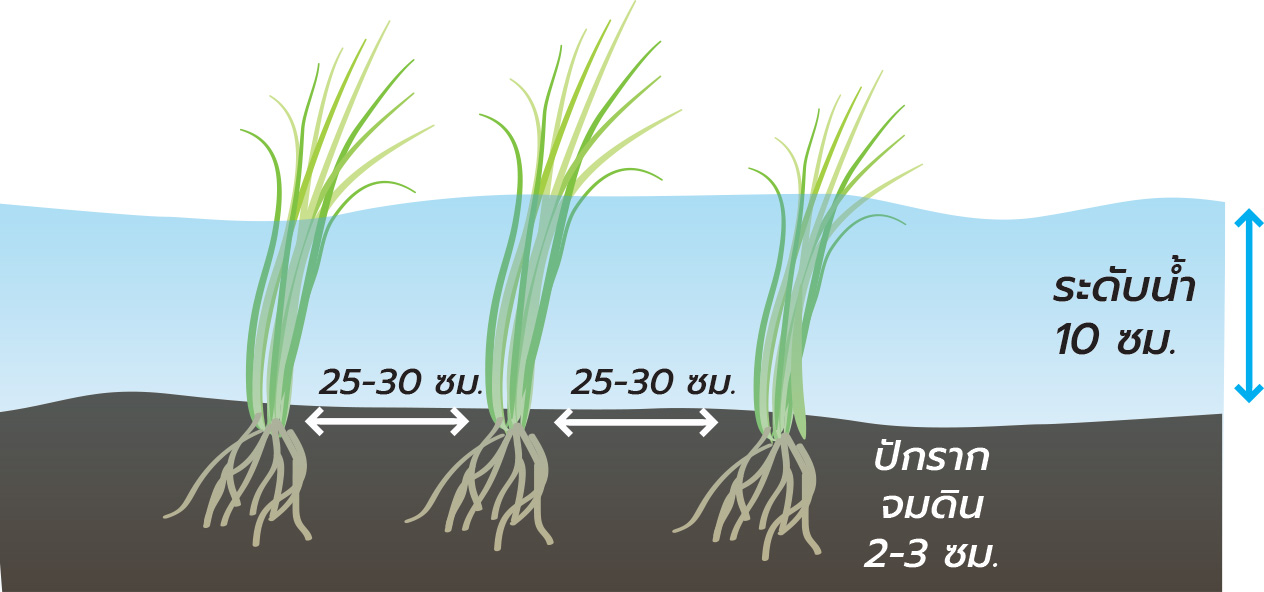
- For easier transplanting, 1 week before transplanting let water into the field to soften the soil. When transplanting, drain the water to about 10 cm.
- Use Riceberry seedlings about 21 days old.
- When transplanting there must be enough water in the field, about 10 cm, but no less than 5–7 cm and no more than 30 cm, or higher than the seedlings, which may then float.
- The transplanting spacing is 25x25 cm or 30x30 cm depending on the soil; if the soil is good, space them wider to prevent rice plants from falling over one another.
- When picking up seedlings for transplanting, take 1–2 plants if the seedlings are old.
- Transplant so the roots sink about 2–3 cm into the soil. If transplanted deep, the rice tillers slowly, but if transplanted shallow, the plants will float.
- While transplanting, press the soil firmly between thumb and forefinger so the rice anchors to the soil.
- Transplant in rows to make care and weeding easier.

7) Water management in the field
This is to control water supply adequately for growing rice and to prevent water contaminated with chemicals from neighboring fields, and to control weeds and rice pests.
Management steps
- Build field bunds no less than 1 meter wide (measured at the base) and higher than the normal water level to prevent water from neighboring chemical fields from flowing in and contaminating.
- Plant shrubs or trees on the bunds to increase biodiversity in the farm and prevent chemical contamination.
- Control the water level during the first 7 days after transplanting so it is almost submerging the rice.
- When the rice begins to tiller, let water into the field and maintain the level at 15–20 cm. If the water is too high, the rice will tiller poorly.
- When the rice begins to boot, drain the water out of the field, leaving water at just ground level.
- If rainwater is insufficient or a reserve water source is needed, dig a pond 20 meters wide, 40 meters long and 3 meters deep (using about 2 ngan of land), which can store water for farming about 10 rai.
- If there is little water in the field (just wetting the ground), grass will appear quickly in rainfed fields. If the water dries up, the rice will not grow fully or its growth will stall. But in irrigated areas, water should be pumped into the field every 7 days.
8) Disease and insect management in organic rice
The key principles of preventing and controlling diseases, insects and animal pests in organic rice are as follows:
- Do not use synthetic substances to prevent or control any rice diseases, insects or animal pests.
- Cultural practices, such as field preparation, setting a suitable planting period, using suitable seed rate and spacing, crop rotation to break the cycle of disease, insect and animal pest outbreaks, maintaining soil fertility and plant nutrient balance, and water management so that rice grows well, fully and strongly, can reduce damage from diseases, insects and animal pests.
- Managing the environment so it is not suited to outbreaks of diseases, insects and animal pests, such as weed removal and removing diseased plant residue using lime or sulfur powder that has not undergone chemical processing, and adjusting the soil so it is not suited to disease outbreaks.
- Maintaining natural balance by promoting the spread and increase of beneficial insects such as predators, parasitoids and natural enemies to help control rice insects and animal pests.
- Planting insect-repellent plants on the bunds, such as citronella and other strong-smelling plants.
- If necessary, plant extracts are allowed, such as neem, galangal, citronella and sesbania leaf.
- Use mechanical methods such as light traps, traps and sticky glue.
- Use biological products such as Trichoderma, Beauveria, Bacillus and Metarhizium to prevent and control insects.

9) Harvesting rice
One week after the rice flowers bloom and are pollinated, the inside begins to form a white liquid starch; in the second week that liquid starch dries into a fairly hard starch, and in the third week the starch hardens further into the shape of a brown rice grain. But the rice can be harvested in the fourth week from the pollination date, so it is reliably believed that the grain is mature and ready to harvest about 28–30 days after flowering.
10) Drying rice and storing the harvest
After harvesting, the rice should be dried on a drying yard to reduce the grain moisture to about 13 percent, or dried in the sun for about 3–5 sunny days. When drying, the grain should be exposed to the sun evenly, and moisture should be spot-checked thoroughly before bagging. The filled sacks should then be stored in a clean, closed place, separate from white rice or other types of rice to prevent contamination.